
This post was originally published by the author (André Lima) on PureHacking’s blog
I love developing tools that will help me automate any repetitive tasks, or diminish the efforts put forth in complex ones. And I’ve also been in love with Python since forever, so I decided to address a few topics that are not usually addressed in great references such as Black Hat Python by Justin Seitz and Violent Python, by TJ O’Connor.
Click
One of the issues I have is, since I’m obviously not developing tools 24/7, I tend to forget the details of argparse, or whatever command line parser you’re using. This means I tend to look for solutions that give me simplicity above all, by having to remember the least amount of code and make it still do all the things I want it to.
The best definition for Click is found on their website: “Command Line Interface Creation Kit”. It allows you to define command line option specifications for your python command line tool in a simple and much more intuitive way, which is its main difference to other alternatives like argparse, optparse or docopt.
The following code will receive two options, count and name, and not only perform its function – repeat greetings to the name as many times as defined in count – but also provide the help argument which will assist on any option/argument explanations as well as the command itself.

If the name is not set, it will be explicitly prompted, and the count variable may be declared both as -c or –count.
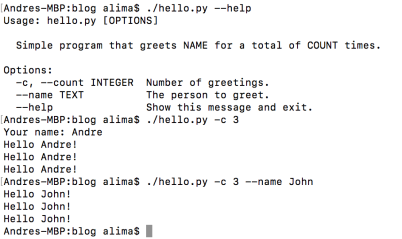
The click.echo function is one of many functions available that allows for support in multiple python versions. This means this will print/echo no matter if you’re running it on python 2.7 or 3.
Click also has all kind of data support in it:
Multi-value options:


Boolean flags: @click.option(‘–shout/–no-shout’, default=False)
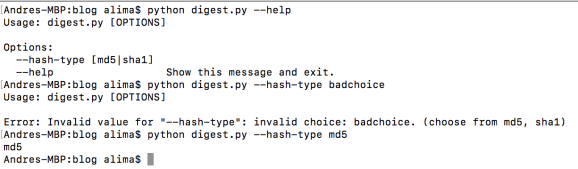
Choice options – allowing to specify valid input to choose from:

Range options – allowing you to specify a range of acceptable numeric values, and the behaviour in case of an out of range value insertion, called <i>clamping</i>. If clamp=True and you provide number 1000 on a 0 to 3 range, it will bring that number down to the closest boundary, or in this case 3:


Password prompt – not only hides the input (hide_input) but also can request the user for the password twice for confirmation (confirmation_prompt): @click.option(‘–password’, prompt=True, hide_input=True, confirmation_prompt=True)
Using environment variables: @click.option(‘–username’, envvar=’USERNAME’)
File path arguments:


VirtualEnv
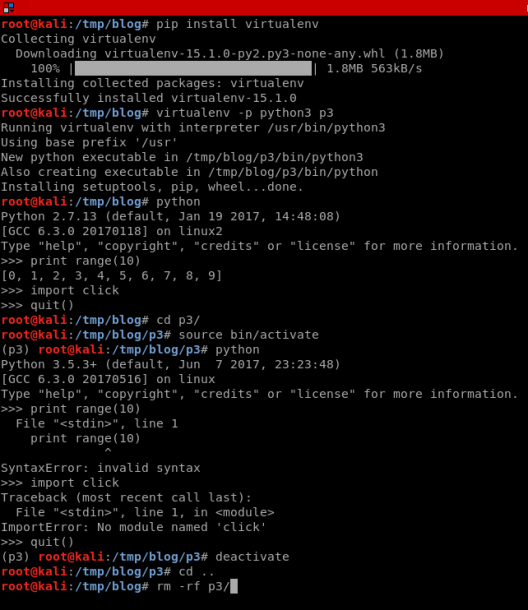
Sometimes you might wish to develop different python scripts in different versions. This sure will be the case, if you can only find a module in a specific version, say python3. Another scenario is one in which you want to test a specific script/module, and it has many other module dependencies, that you wish to clean up at the end without having to take notes on each module install for later deletion.
This brings us to virtual environments, where you can isolate exactly the python version to execute and be able to drop the environment at the end swiftly. In the following example, I create an environment called p3, which will have python3 on by default. And when I get into it, you can definitely see the difference to the previous environment where the commands were all successfully executed.
CGIHTTPServer
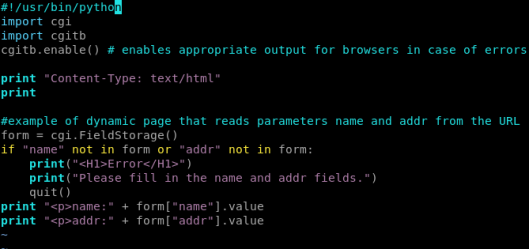
Most are fairly familiar with SimpleHTTPServer, but not many use CGIHTTPServer. It’s basically a dynamic version of SimpleHTTPServer, since you can send in parameters that will be inputted into CGI scripts wich you can do in Python. To load up the server you call python –m CGIHTTPServer (case sensitive).
demo.py file:
Accessing CGI without parameters:

Accessing correctly:

mechanize
There is such a simplicity to the usage of the mechanize module, that it had to be mentioned. The easy way in which you can develop brute-forcers, fuzzers, or proof of concept code with this module is definitely something I appreciate.

selenium
Selenium is a webdriver implementation. In our case we use the one written in python, and it allows for a more intuitive way to navigate through a browser’s website, much the same way we do it graphically. One of my favourite features is its ability to screenshot the website and, while there are many tools that already do mass screenshot of URLs (e.g. peepingtom), it is still a nice trick to have up your sleeves for more specific situations which other tools won’t cover.

Hacking Python Imports
This one I actually learned while reading a great book, that I already mentioned: Black Hat Python by Justin Seitz.
The objective here is to intercept a call to a module, at any point of the module call flow made by python to locate it. And why would I want to do this? For example, to pull modules straight out of ZIP files, or out of remote repositaries (github, dropbox, pastebin, or any other platform which I can access through python), or maybe I wish to intercept import requests and deny access to certain outdated/vulnerable/dangerous python modules.
So the reasons can be many, but how can we do it? First, it’s important to understand how it works without going into greater details.
The default behaviour is for python to look for the module in all paths inside sys.path which usually contains entries inserted by external libraries or the operating system, as well as some standard directories as in distribution packages.

The first module found will be used, but if nothing is found, it returns an ImportError. This allows us to play (in a very ugly way) with the code:

This interception can be done by using import hooks. There are two types, typically referred to as meta hooks (sys.meta_path) and path hooks (sys.path_hooks). They are invoked at slightly different stages of the import flow, but they basically implement two methods: find_module and load_module.
The following code is part of a trojan implementation in Black Hat Python by Justin Seitz, that I was testing, where you can easily spot both methods, which will update the trojan’s features/capabilities by downloading recently provided code (modules) in a github repo.

Hope you enjoyed this post and that you learned something from it. Please let me know of important python hacks you think should be here.
Thank you.

Above the syntax are useful,i practicaly worked.Thank you
LikeLiked by 1 person
Lovely blog you haave here
LikeLike